This basic floor covering preparation steps apply to all flooring tiles in kitchen or bathroom or with any tiles, mosaic or ceramic and more. If this is your first time doing some floor projects (e.g., tiling) we would recommend starting out with projects on the floor as it is a better place to begin than on a wall because it requires even more skill due to the vertical nature of the walls, in tangent with the effect of gravity.
Every project is different and not all step-by-step instructional are exhaustive. If you are doing this in your own home, you will inevitably encounter something not covered by this or any floor covering preparation steps but if you follow these steps, generally, you will find success in your project.
WHAT IS FLOOR COVERING PREPARATION
Floor covering preparation includes demolishing or otherwise dismantling any previously installed flooring as well as establishing a connection between the concrete and the flooring. It does not matter if the space is domestic, corporate, or industrial; the floors need to have the appropriate floor covering preparation done before new floors or replacement floors can be installed. After the previous flooring has been removed and the demolition work has been completed, the concrete slab must be prepared for the installation using the appropriate tools. This operation can be carried out in a few different ways; nevertheless, highly specialised machines are always required to clear away any remnants of the previous flooring system.
To remove previous flooring in a way that is rapid, safe, and efficient, these equipment, which were specifically developed for the purpose, are employed. This standard procedure not only ensures a smooth and spotless surface, but also does so without causing any damage to the concrete slab beneath. When we employ these cutting-edge machines, we don’t have to resort to using harmful chemicals that are bad for both people and the environment. This saves us time and money.
BASIC FLOOR COVERING PREPARATION STEPS
STEP 1: PREP THE SUBFLOOR
This is the most important step. This is a determining factor whether the tiling will be successful or not. But what exactly is a subfloor? It is a catch-all term for the floor underneath your finished floor. There are two primary types of subfloor: wooden and concrete. Both suffer from the same tile-killing issue: movement. Wood moves and flexes with humidity and changes in temperatures; concrete can move depending on humidity, moisture, soil movement, and temperature.
FOR WOODEN SUBFLOORS
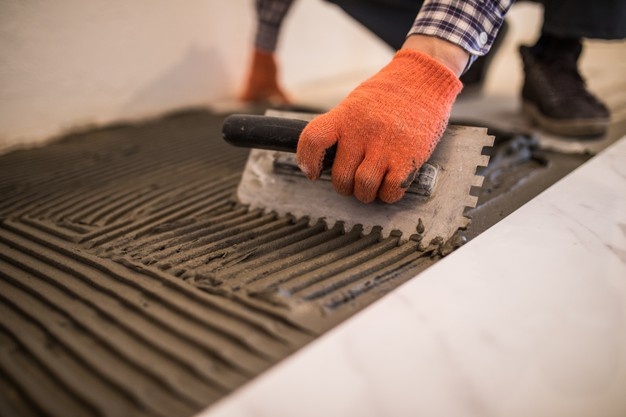
Any staples should be removed and any screws or nails that are sticking up too far should be driven down. Install a cement backer board to set a good base for your tile and prevent any movement-related cracking of tile or grout.
Backer board is screwed down to wood subfloor using specific backer board screws and mortared down with tile adhesive mortar plywood subfloor. Remember to tape and mortar the joints between the pieces of backer board. Crack prevention membrane is mortared down ion both surfaces. This membrane also acts as a waterproofing membrane and is helpful addition in a wet area, a second floor, or a plywood subfloor application. A notched trowel is used to spread the mortar at a 45-degree angle to the plywood subfloor.
FOR CONCRETE SUBFLOOR
When dealing with concrete subfloors, any old adhesive should be removed and any cracks should be patched/filled with the appropriate product. You could always look up for stores or ask for advice from experts on floor preparation contractors if you want to know what the best product for you to use is. Use a floor scraper to remove any loose debris. For old adhesive or mortar, this may require some elbow grease and possibly grinding to remove from the subfloor and allow the new mortar to bond so if you are unsure, it is better to contact floor covering preparation experts for professional advice. Floor tiles can be installed directly onto a concrete subfloor.
Whether wooden or concrete, the importance of this step is to make sure your subfloor is clean and free of debris. For better results you should consider hiring floor preparation contractors so not to waste your money and have the best floor covering preparation.
STEP 2: RECTIFY ANY DEFECTS
A subfloor that has broken concrete, damaged wooden boards, loose nails, or cracks needs to be repaired. The subfloor needs to be 100% defect free before any type of new flooring can be installed.
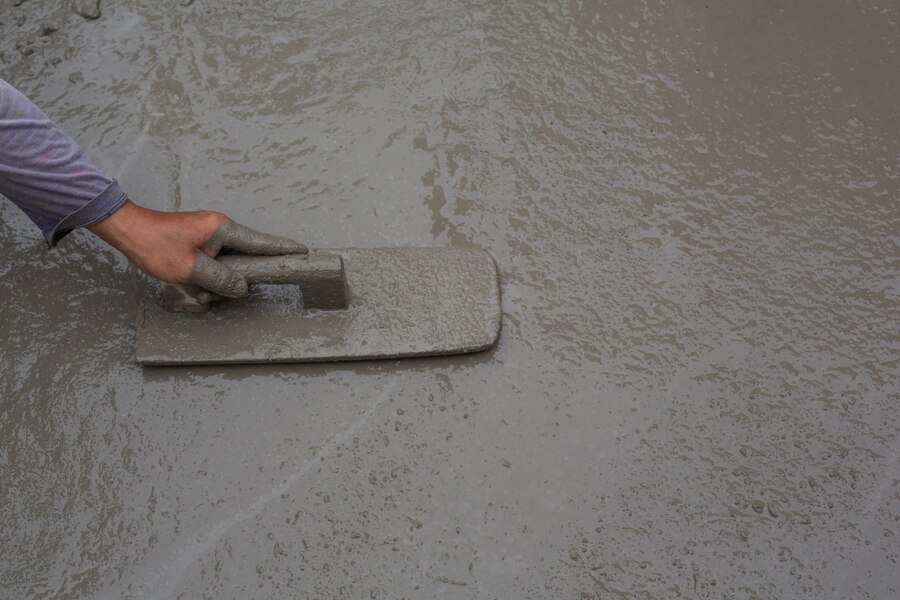
STEP 3: LEVEL THE SUBFLOOR
The floor must be evened out especially if you want a grind and seal concrete floor. Check for any low spots. When doing this step, make sure that the subfloor is structurally solid and capable of supporting the load of the floor. There is a debate on what is the correct “self-levelling” and what measurements are the correct one but if the client requires a perfectly flat floor, this needs to be communicated to the main contractor responsible for the application to ensure that everything is placed with accuracy. It is very crucial to specify the depth as well as the hardness of the screed that you want installed during floor covering preparation.
STEP 4: ENSURE THE SUBSTRATE IS CLEAN AND DRY
You need to make sure that the substrate is completely clean and dry especially if you want a clean epoxy floor coating. All curing agents, dust, debris, surface contaminants need to be removed because contamination on the surface can have a negative impact on the bond between the underlayment and the substrate. In some circumstances, a moisture test may also be needed to be done.
STEP 5: CONSIDER PRIMING SYSTEMS
The type, and finish, of subfloor you are working on and the kind of floorcovering you are installing may necessitate a priming system to achieve a good bond onto the substrate.
ADDITIONAL TIPS FOR FLOOR COVERING PREPARATION AND INSTALLATION
The following advice will make the process of installing your new floor less stressful for you:
- Before construction can begin, all of the furniture must be removed from the room.
- If your furniture will be removed by installers, it would be courteous of you to empty and clear off the furniture before they arrive.
- Take down any items that are hanging on the walls. In the event that this precaution is not taken, the vibrations that come from the job being done can cause the valuable things to fall. In addition to that, the likelihood of them being dusty is high.
- Empty closets and drawers.
- Every project is distinct. After the old flooring has been removed, you should be prepared for extra floor prep and have an understanding of what is involved.
RISKS OF POOR FLOOR COVERING PREPARATION
Concrete is a highly resistant and sturdy material; yet, it will decay if it is not prepared correctly and maintained in the correct manner. Some people might be curious about whether or not anyone will even see their concrete. Even while the concrete that lies beneath your floor won’t be visible to the naked eye, that doesn’t mean that it shouldn’t be properly prepared and maintained. When you are having your flooring replaced, it is crucial to check that the concrete underneath is neat, flat, and does not have any fractures in it. Putting down a new flooring system on concrete that has not been properly prepared or maintained can result in a number of complications, including the following:
- Uneven surfaces
- Insufficient adherence
- Cracks
- Holes
Because of these side effects, there is a possibility that people, machinery, and even furnishings could become unstable. If the surface preparation is not done properly, your new floor will wear out more quickly, which may be a significant waste of both your time and your money.
IMPORTANT MEASURES TO TAKE IN ORDER TO DECREASE THE RISK OF FLOORING FAILURE
Contractors should meticulously condition the substrate before undertaking any installation so that they can ensure the outer layer is fully polished, level, dry, and structurally sound before initiating any installation. This step is essential to ensure that the finished flooring functionality will not be impaired, which would necessitate a full reinstallation or expensive repairs in the event that it is.
When selecting a substrate, there are also a few special factors to take into account because the major function of this kind of construction material is to give excellent adhesion to the intended floor covering. Even though there are many other kinds of substrates, plywood and concrete slabs are the ones that are utilised the most frequently due to the fact that they are strong and durable.
To create plywood substrates, prefabricated strips of wood veneer are layered, then cross-laminated after being bound together using specialised adhesives, subjected to heat and pressure, and then layered again. With this method, you can rest assured that the substrate will not be vulnerable to the inflation and compression that hardwood is famous for.
When working with plywood, it is advised that technicians put a subfloor glue to the top of the floor joists. This will prevent the plywood from shifting and squeaking during the installation process. In conclusion, the type of flooring finish that is chosen dictates both the proper type of underlayment and the appropriate thickness of that underlayment.
WHAT TO EXPECT DURING THE PREPARATION AND INSTALLATION?
You might think of this your chance for a DIY project as you can purchase epoxy floor kits but professional installations are highly recommended for the best results. Proper floor covering preparation, primer application, epoxy mixing, and other vitals steps must take place before the epoxy goes down. Plus, once the application starts, you must work quickly before the epoxy dries.
Hiring professionals means that you will get quality epoxy flooring services. This involves giving careful attention to each step in the process. From the time floor covering preparation starts to when the epoxy has completely cured, the entire installation takes about four to five days. The time you spend parking your car in the driveway is well worth the wait.
WHERE TO GET THE BEST FLOOR PREPARATION SERVICES?
Renucrete has years of experience, highly professional and skilled employees and most of all modern techniques and equipment that will surely help in the floor covering preparation project you want. If you want to learn more, explore our official website or contact us so we can directly answer all your questions.
Get a quote for our flooring preparation services by filling out the form below: