Polished concrete has emerged as a popular flooring choice for both residential and commercial spaces, thanks to its sleek appearance, durability, and low maintenance requirements. However, like any flooring material, polished concrete is not immune to wear and tear, particularly in the form of cracks. These cracks can detract from the aesthetic appeal and compromise the structural integrity of the surface. Whether you’re dealing with minor hairline fractures or significant structural issues, understanding how to effectively repair these imperfections is crucial
Polished concrete is a versatile and increasingly popular flooring choice known for its durability, low maintenance, and sleek aesthetic.
What is Polished Concrete?
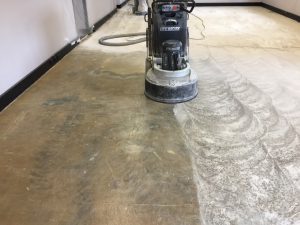
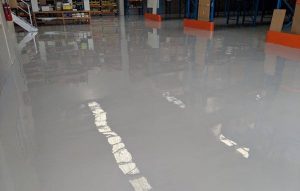
Polished concrete is a highly versatile and increasingly popular flooring option that involves mechanically grinding, honing, and polishing a concrete surface with bonded abrasives to achieve a smooth, glossy finish. This process not only enhances the aesthetic appeal of concrete but also improves its functionality. The benefits of polished concrete flooring are numerous: it is exceptionally durable and resistant to wear, making it ideal for high-traffic areas. It requires minimal maintenance, typically just regular sweeping and occasional mopping, which makes it cost-effective over its lifespan. Polished concrete is also eco-friendly, as it utilizes the existing concrete slab, reducing the need for additional materials and enhancing natural light reflectivity, thus decreasing the need for artificial lighting. Additionally, it offers a sleek, modern look that can complement a wide range of design styles, from industrial to contemporary. These advantages make polished concrete an excellent choice for both residential and commercial spaces.
Common Causes of Cracks in Polished Concrete
Despite its many advantages, polished concrete is not immune to cracks. Understanding the common causes of these cracks can help in preventing and addressing them effectively.
- Shrinkage: As concrete dries and hardens, it shrinks, which can lead to the formation of cracks.
- Thermal Expansion and Contraction: Changes in temperature cause concrete to expand and contract, potentially leading to cracks over time.
- Structural Loads: Heavy loads or impacts can stress the concrete, resulting in cracks.
- Improper Installation: Poor mixing, inadequate curing, or incorrect placement can cause the concrete to crack prematurely.
- Subgrade Movement: Shifts or settling in the ground beneath the concrete slab can create stress points that lead to cracking.
Understanding these foundational aspects of polished concrete will equip you with the knowledge needed to appreciate its benefits and address any challenges that may arise, particularly when it comes to maintaining and repairing cracks.
Assessing the Damage
Before undertaking any repair work on polished concrete, it’s crucial to thoroughly assess the damage. Proper assessment helps in choosing the right repair methods and materials, ensuring effective and long-lasting results. Here are the steps to evaluate the condition of your polished concrete and understand the extent of the cracks:
1. Identifying the Type and Extent of Cracks
- Visual Inspection: Begin with a detailed visual inspection of the concrete surface. Note the location, size, and pattern of the cracks. Use a flashlight for better visibility in dim areas.
- Measure Crack Width: Use a crack gauge or a simple ruler to measure the width of the cracks. This helps in determining whether the cracks are superficial or structural.
- Depth Assessment: To assess the depth, use a depth gauge or insert a thin object into the crack. This will help you understand if the crack penetrates through the slab or is confined to the surface.
2. Evaluating the Underlying Causes
- Material Shrinkage: Determine if the cracks are due to shrinkage by evaluating the timing of their appearance. Shrinkage cracks typically form shortly after the concrete has been poured.
- Load Stress: Consider whether heavy loads or impacts might have caused the cracks. Look for patterns that align with high-traffic areas or points of heavy impact.
- Subgrade Issues: Check for signs of subgrade settlement or shifting. Uneven settling can lead to significant cracks, indicating a need for subgrade stabilization.
- Environmental Factors: Assess the environmental conditions, such as temperature fluctuations and exposure to moisture, which can cause thermal and shrinkage cracks.
3. Tools and Techniques for Crack Inspection
- Crack Monitors: Use crack monitors to track changes in crack width over time. This helps in understanding if the cracks are stable or worsening.
- Concrete Test Hammer: A rebound hammer can provide insights into the hardness and strength of the concrete around the cracks.
- Moisture Meters: Use moisture meters to check for excess moisture in the concrete, which can contribute to cracking and other issues.
- Ultrasonic Testing: For deeper assessment, ultrasonic pulse velocity testing can help identify internal flaws and the extent of the cracks.
4. Documenting the Damage
- Photographic Evidence: Take clear photographs of all the cracks from multiple angles. This documentation will be useful for monitoring changes and explaining the issues to professionals if needed.
- Detailed Notes: Keep detailed notes on the characteristics of each crack, including width, depth, location, and any suspected causes. This information is crucial for planning repairs.
5. Determining the Severity and Urgency
- Surface vs. Structural Cracks: Differentiate between minor surface cracks and deeper structural cracks. Structural cracks require more immediate and intensive repair efforts.
- Progression Risk: Assess the risk of the cracks spreading or worsening. Cracks that are likely to expand need prompt attention to prevent further damage.
- Impact on Aesthetics and Functionality: Consider how the cracks affect the appearance and usability of the concrete surface. Aesthetic concerns may be less urgent but still important for maintaining the polished look.
By carefully assessing the damage and understanding the underlying causes, you can select the most appropriate repair techniques and materials. This thorough evaluation ensures that your efforts to repair polished concrete will be effective, preserving both its durability and aesthetic appeal.
Repair Techniques for Polished Concrete Cracks
Repairing cracks in polished concrete requires a strategic approach to ensure the restored surface is both durable and aesthetically pleasing. Here are the most effective repair techniques tailored for various types of cracks in polished concrete:
1. Epoxy Injection for Structural Cracks
- When to Use: Epoxy injection is ideal for repairing deep, structural cracks that compromise the integrity of the concrete slab.
- Materials Needed: Epoxy resin, injection ports, injection pump.
- Steps:
- Clean the Crack: Remove any debris and dirt from the crack using a wire brush and vacuum.
- Install Injection Ports: Place injection ports along the length of the crack and seal the surface around them with epoxy paste.
- Inject Epoxy: Use an injection pump to fill the crack with epoxy resin from bottom to top, ensuring the crack is fully filled.
- Remove Ports and Finish: After the epoxy has cured, remove the ports and grind the surface smooth.
2. Polyurethane Sealants for Flexibility
- When to Use: Polyurethane sealants are suitable for cracks that are subject to movement, such as those caused by thermal expansion and contraction.
- Materials Needed: Polyurethane sealant, caulking gun, backer rod (if necessary).
- Steps:
- Clean the Crack: Ensure the crack is free of dust and debris.
- Apply Backer Rod: Insert a backer rod into the crack if it’s deep to provide a base for the sealant.
- Seal the Crack: Use a caulking gun to apply the polyurethane sealant, ensuring it fills the crack completely.
- Smooth the Surface: Use a putty knife to smooth the sealant, blending it with the surrounding concrete.
3. Concrete Patching Compounds
- When to Use: Patching compounds are effective for wide, shallow cracks and areas where the concrete surface has spalled or chipped.
- Materials Needed: Concrete patching compound, trowel, bonding agent.
- Steps:
- Prepare the Surface: Clean the area and apply a bonding agent to ensure adhesion.
- Mix Patching Compound: Follow the manufacturer’s instructions to mix the patching compound.
- Apply the Compound: Use a trowel to apply the compound into the crack, leveling it with the surrounding surface.
- Finish the Surface: Smooth the surface and allow it to cure as per the manufacturer’s recommendations.
4. Polishing and Finishing the Repaired Surface
- When to Use: After any crack repair, especially when the goal is to maintain a polished appearance.
- Materials Needed: Concrete grinder, diamond polishing pads, concrete sealer.
- Steps:
- Grind the Surface: Use a concrete grinder to smooth out the repaired area, starting with a coarse grit and progressing to finer grits.
- Polish the Concrete: Continue polishing with progressively finer diamond pads until the desired sheen is achieved.
- Apply Sealer: Finish with a concrete sealer to protect the surface and enhance its polished look.
5. DIY vs. Professional Repair Kits
- When to Use: Depending on the complexity and extent of the damage, DIY kits can be used for minor repairs, while professional kits are better suited for extensive or structural damage.
- Materials Needed: Varies by kit type, typically includes repair compounds, tools, and instructions.
- Steps:
- Select the Right Kit: Choose a kit appropriate for the type and extent of cracks.
- Follow Instructions: Adhere to the provided instructions for mixing and applying the repair materials.
- Finish the Repair: Complete the repair by smoothing and blending the patched area with the existing polished surface.
By selecting the appropriate repair technique based on the type and severity of the cracks, you can effectively restore the integrity and appearance of your polished concrete surfaces. Whether using epoxy injections for deep structural cracks or polyurethane sealants for flexible, surface-level cracks, these methods ensure long-lasting and visually appealing results.
Renucrete: Cracking the Code to Flawless, Long-Lasting Polished Concrete
Mastering the techniques for repairing polished concrete cracks is essential for maintaining the beauty and longevity of your floors. By understanding the types of cracks, assessing the damage accurately, and applying the appropriate repair methods, you can ensure your polished concrete surfaces remain both durable and visually appealing. Whether you’re tackling minor hairline cracks or addressing significant structural issues, these techniques will help you achieve professional results. For expert advice and high-quality repair products, trust Renucrete. Our commitment to excellence and extensive experience in polished concrete solutions make us your ideal partner in maintaining flawless, long-lasting floors. With Renucrete, you can confidently crack the code to mastering polished concrete crack repair techniques.
Get a quote for our polished concrete flooring services by filling out the form below:


